Corrugated metal roofing has become one of the most popular and practical choices for both residential and commercial buildings. Known for its durability, cost-effectiveness, and energy efficiency, corrugated metal provides excellent protection against harsh weather conditions. Whether you’re replacing an old roof or installing a new one, the efficiency of the installation process is key to ensuring a high-quality result that will last for years to come. Here are expert tips for a smooth and successful corrugated metal roof installation.
1. Thorough Planning and Preparation
Before beginning your corrugated metal roof installation, thorough planning is essential. The foundation of a successful roofing project is detailed preparation, from assessing the roof structure to selecting the right materials. Here’s what to do during the planning phase:
- Assess the Roof Structure: Ensure the roof’s framework is sturdy and capable of supporting the metal panels. If the roof structure is weak or damaged, it should be repaired before installation begins.
- Measure the Roof Dimensions: Accurately measure the width, length, and pitch (slope) of your roof. Correct measurements are crucial for calculating the right number of panels and materials. Make sure to account for overhangs, eaves, and ridges when taking measurements.
- Check Compatibility with Corrugated Metal Panels: Ensure that the pitch of your roof is compatible with corrugated metal panels. Most metal roofs require a minimum slope of 3:12 (3-inch rise for every 12 inches of horizontal run), but check manufacturer specifications for your specific panel type.
2. Choosing the Right Materials
Selecting the appropriate materials for your corrugated metal roof will have a direct impact on its performance, longevity, and aesthetic appeal. Here’s what to consider:
- Metal Type: The most common metals used for roofing include steel, aluminum, and copper. Steel is the most popular due to its affordability and strength. Aluminum is corrosion-resistant and lightweight, while copper offers a high-end, stylish look but is generally more expensive.
- Gauge (Thickness): Metal roofing comes in various thicknesses. The lower the gauge number, the thicker the metal. For most residential roofs, a 26-gauge metal panel is sufficient. However, if you live in an area with severe weather conditions, you may opt for 24-gauge or thicker panels.
- Coating and Finish: Galvanized steel (coated with zinc) provides superior corrosion resistance. Pre-painted panels offer an additional layer of protection from the elements and can enhance the roof’s visual appeal. Choose coatings designed for your climate for maximum durability.
- Fasteners, Trim, and Underlayment: Ensure you have the correct fasteners for the job, such as rust-resistant screws with rubber washers. Also, stock up on flashing, trim pieces, and high-quality underlayment, which will act as an extra layer of protection against leaks.
3. Safety First: Precautions and Gear
Roofing can be hazardous, so it’s important to prioritize safety throughout the installation process. You can also click here https://barrierboss.ca/products/black-corrugated-metal-roofing-sheets to find the right Corrugated Metal Roof Installation services. Here are essential safety precautions to follow:
- Wear Proper Safety Gear: Always wear a helmet, non-slip shoes, and gloves. Using a harness or fall arrest system is highly recommended when working on steep roofs.
- Secure Ladders and Scaffolding: Ensure that your ladder is stable and set up properly. If you’re working on a particularly tall or steep roof, consider using scaffolding for added security.
- Work on a Dry, Calm Day: Installing a metal roof on a wet or windy day increases the risk of accidents. Wait for a dry, calm day to perform the installation.
- Use Proper Tools and Equipment: Ensure that you have all necessary tools within reach to avoid unnecessary trips up and down the ladder.

4. Install the Right Underlayment
Underlayment is an often-overlooked yet crucial layer in roofing installations. It acts as an additional barrier between the metal panels and the roof deck, enhancing waterproofing and insulation. Here’s what to keep in mind:
- Choose High-Quality Underlayment: Synthetic underlayment is preferred for its superior durability compared to traditional felt paper. It provides extra protection against leaks and prevents water from seeping into the roof deck.
- Proper Installation: Lay the underlayment across the roof deck, ensuring that there are no wrinkles, gaps, or areas of insufficient coverage. Overlap the edges of each layer by at least 6 inches to prevent water from infiltrating at the seams.
- Ensure Seamless Coverage: Begin at the roof’s eaves and work your way up, overlapping each row of underlayment as you go. Be careful not to tear or damage the material.
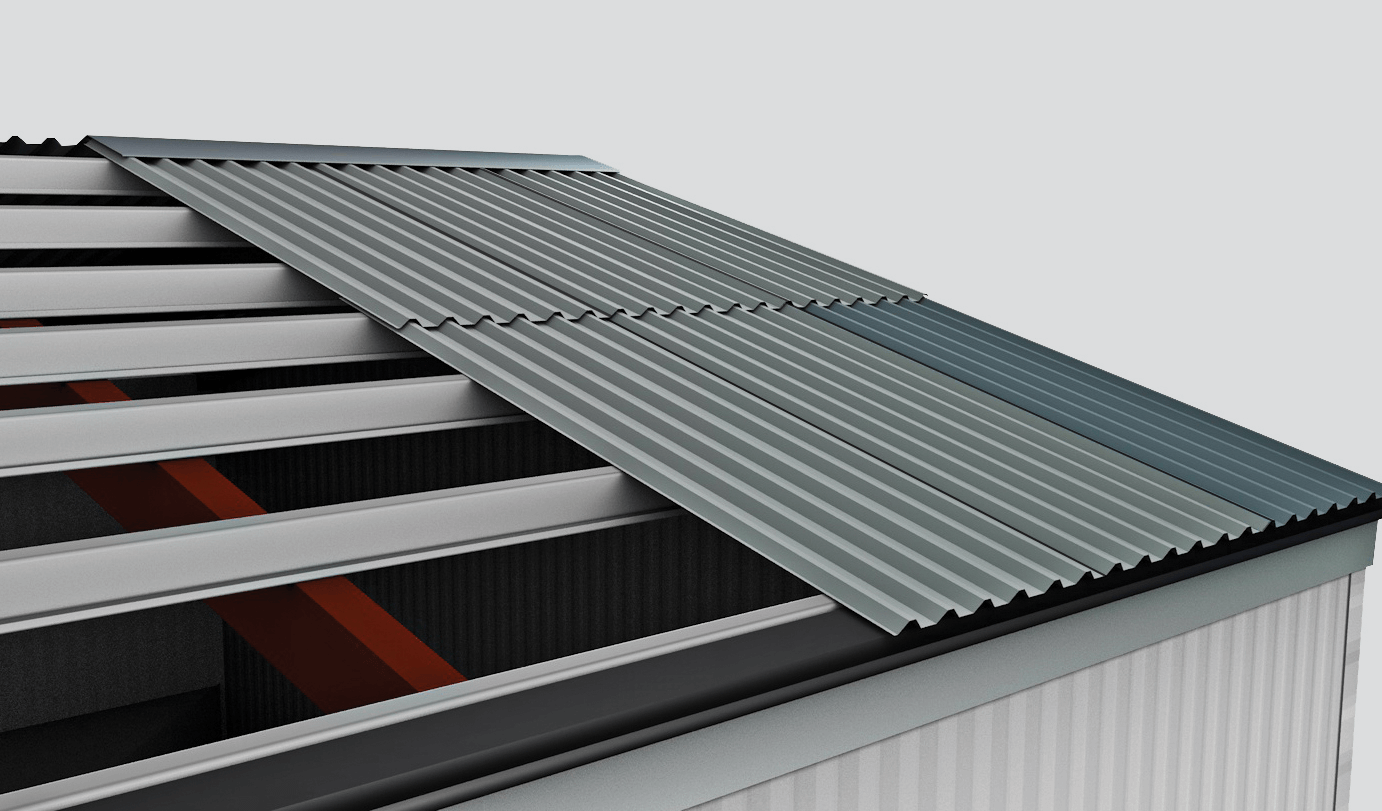
5. Correct Panel Alignment and Installation
Aligning and installing the metal panels properly is key to ensuring a functional and aesthetically pleasing result. Follow these steps for a successful panel installation:
- Start at the Eaves: Begin by installing the first row of panels at the lowest point of the roof (the eaves) and work your way up to the ridge. This ensures that water flows downhill between the overlapping panels.
- Use a Chalk Line for Straight Edges: To maintain straight lines, use a chalk line as a guide when placing your first row of panels. This ensures each row is aligned perfectly with the roof’s edges.
- Ensure Proper Overlap: Corrugated panels must overlap by a minimum of 1-2 inches to prevent water from seeping through the seams. The amount of overlap may vary based on the specific panel type, so always follow the manufacturer’s guidelines.
- Trim Panels as Needed: For panels that need to be trimmed, use a metal-cutting saw with a fine-toothed blade. Always wear protective eyewear and gloves when cutting metal.
6. Fasten the Panels Securely
Securing the panels correctly is essential to prevent leaks and ensure the roof’s durability. Here’s how to fasten the panels properly:
- Use High-Quality Fasteners: Use screws with rubber washers designed for metal roofing. These fasteners are specifically made to create a tight seal and prevent water from leaking through the holes.
- Place Fasteners in the Valleys: Always place screws in the valleys (lower parts) of the corrugations, rather than the peaks. This helps ensure that the screws don’t damage the metal or create gaps for water to seep through.
- Avoid Over-tightening: Tighten the screws enough to secure the panels but avoid over-tightening, as this can cause the metal to buckle or distort, leading to potential leaks.
7. Install Flashing and Trim for a Finished Look
Properly installing flashing and trim pieces is essential to creating a polished, leak-free roof. Flashing helps seal areas around roof penetrations, such as vents, chimneys, and skylights. Follow these tips:
- Install Flashing Around Penetrations: Flashing should be installed around chimneys, vents, skylights, and other roof penetrations to prevent water from infiltrating these vulnerable areas.
- Seal Flashing Edges: Ensure that the flashing edges overlap the metal panels and are securely fastened to prevent water from getting behind the flashing.
- Add Trim for a Polished Finish: Install trim along the roof edges and ridges to protect against wind uplift and provide a clean, finished appearance. Make sure the trim fits securely and overlaps properly.
8. Inspect and Maintain Your Metal Roof
Once the installation is complete, conduct a thorough inspection to ensure everything is secure and leak-free. Check for the following:
- Loose Fasteners or Misaligned Panels: Ensure all fasteners are tightened properly and that no panels are loose or misaligned.
- Proper Flashing Installation: Double-check that the flashing is installed correctly and that it overlaps the panels adequately.
- Leak Prevention: Check for any signs of leaks by inspecting areas prone to water infiltration, such as seams, valleys, and penetrations.
Once the roof is installed, regular maintenance is essential to ensure its longevity:
- Routine Inspections: Perform a roof inspection every year, especially after heavy storms or extreme weather events.
- Clean the Roof: Clear debris, such as leaves and branches, from the roof surface and gutters to prevent water damage.
Conclusion
Installing a corrugated metal roof is an efficient and cost-effective way to protect your home or business. By following these expert tips—thorough planning, selecting the right materials, prioritizing safety, and using proper installation techniques—you can ensure a successful roofing project. Whether you’re a seasoned roofer or a DIY enthusiast, these strategies will help you achieve a durable, leak-free, and aesthetically pleasing corrugated metal roof that will stand the test of time.
Contact Us
Business Address: 1840 Byland Rd, West Kelowna, BC V1Z 3E5, Canada
Website: https://barrierboss.ca/
Business Phone: +12509004895
GMB:- https://maps.app.goo.gl/xBYQjKeSNFebZnpw5
Hours of Operation: Mon To Fri: 9 am–5 pm, Sat-Sun: Closed
Email: orders@barrierboss.ca